Time-lapse and stop-motion are creative ways to tell stories, document projects/exhibitions, or just make beautiful art.
In this post, we will explore several different techniques for creating stop-motion and time-lapse photography using a variety of cameras (DSLRs, GoPros, smartphones) and accessories. We will also cover editing and outputting finished works with tools from Adobe Creative Suite.
Time-Lapse
Time-Lapse is the photographic technique of taking a sequence of images at set intervals to record changes that take place slowly over time. When the frames are played back at at normal video rate (24fps, 30 fps, 60fps) the action appears smooth like video but sped up.
“I Left My Heart” SF Timelapse Project from Marc Donahue on Vimeo.
Motion-Control Time Lapse is the technique of adding camera movement to time-lapse photography, as seen in the video above. The challenge with motion control time lapse, is that the camera has to move at a very slow and continuous rate while shooting. Imagine trying to hold a slow, steady zoom, dolly or pan for an extended period of time. This is typically accomplished with the use of an intervalometer and motion control device, like the Genie seen in the video below.
Genie – Motion Control Time Lapse Device from Syrp on Vimeo.
Unfortunately, these are cost prohibitive, but the DIY culture has come up with multiple hacks for this. One very accessible method is converting a $3.99 Ikea egg timer into a motion control device. An egg timer has a motor that can move a lightweight camera (Flip Cam, GoPro, Iphone, etc.) in a 360 degree pan than lasts an hour. Below is an example.
Another ingenious low-tech method involves using only a camera and tripod to shoot the images, then stabilizing the footage in a motion graphics compositing application, such as Adobe After Effects. The Amazing video “Paris in Motion” was shot using this method.
Paris in Motion (Part 1) from Mayeul Akpovi on Vimeo.
Making Of – Paris in Motion from Mayeul Akpovi on Vimeo.
Without an intervalometer (the device which releases the shutter at set intervals), you will have to devise another method of evenly spacing out your shots. In the case of the “Paris in Motion” examples, the photographer took 10 paces, then took a picture. I’ve heard of ambitious students timing themselves and taking a picture every 15 seconds over the course of an hour. Many cameras have a built in feature for this, and there are a multitude of apps for smartphones for taking pictures at set intervals.
Teehan+Lax Labs has created an application that allows users to create hyper lapse videos using stitched together images form Google Street View. See example below. You can make your own here http://hyperlapse.tllabs.io
Google Street View Hyperlapse from Teehan+Lax Labs on Vimeo.
NOTE: Now there are many apps that allow you to create stop-motion and time-lapse video. And some newer smart phones have these features built in. Studioneat.com posted a great primer on how the iOS 8 time-lapse feature works.
iOS 8 Time-lapse Test – 5 minute Recording Duration from Studio Neat on Vimeo.
Hyperlapse from Instagram is a nifty app that allows one to create stabilized hyperlapse videos.
Stabilization for Hyperlapse from Instagram from Instagram on Vimeo.
Stop-Motion
Stop-Motion is an animation technique in which inanimate objects are photographed in different positions, then the images are played back at a video rate (frames/second) which emulates real motion.
Shooting tips for time-lapse and stop motion
Shoot in manual mode whenever possible to take control of focus and exposure. Always use a tripod or some support to keep the camera still. Use a remote shutter release if possible to avoid shake form manually depressing the shutter release. Make sure you have the storage capacity needed for all your photos.
Once all your images are captured, both Time-Lapse and Stop-Motion videos can be created with Photoshop. Place all your images to be used in a single folder. From Photoshop, click on file open, highlight your first image, and select “image sequence.”

Then set your frame rate.

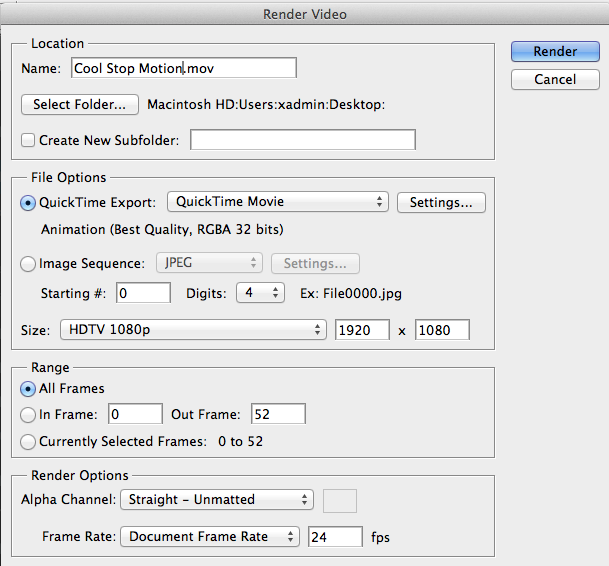
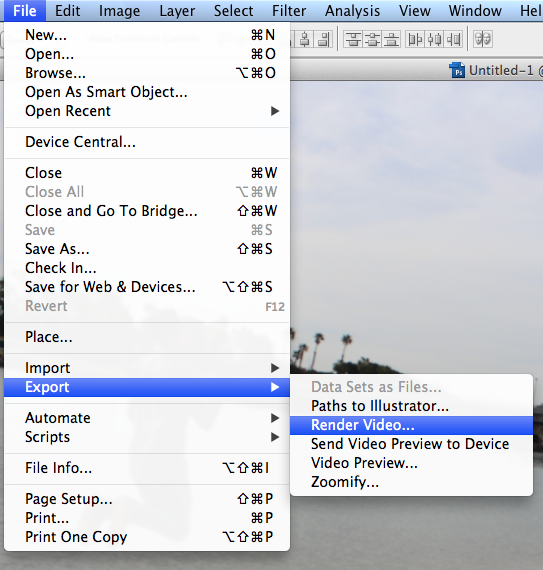
To export as a video, select File>Export>Render Video.
Select your settings and then click Render.